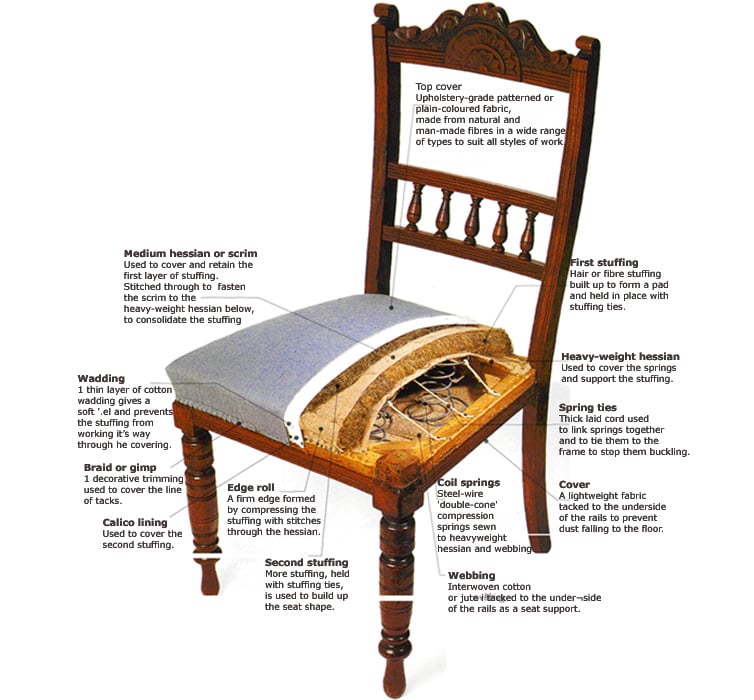
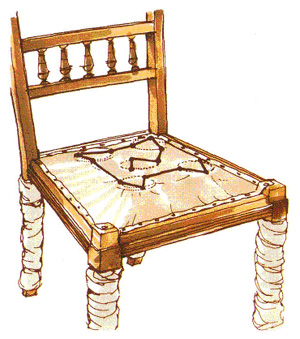
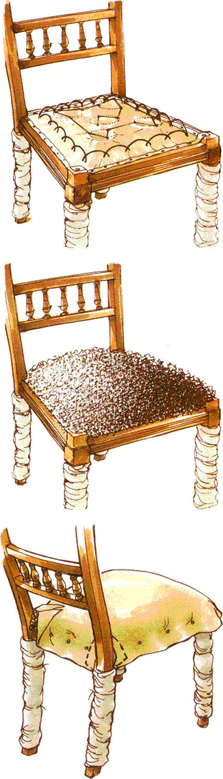
TRADITIONAL STUFFOVER SEAT
Stuffover seats are the thick seat pads enclosing most or all of the seat rails on dining chairs. The covering is either tacked off under the frame or fixed and trimmed on the face of the rails. Early seats used a thick pad of stuffing built up on hessian-covered webbing fixed to the top of the frame. Later seats used coil springs. The webbing supports for the springs were tacked to the underside of the rails. The position of the webbing tack holes on a bare frame indicates whether springs were originally fitted to the seat, although they may have been added subsequently. Stuffover seats

The stuffing is built up and then consolidated with stitching to form an edge roll that gives the overall shape. Where springs are not used, the stuffing is built on a flat hessian platform similar to that of a drop-in seat. The hessian panel of a sprung seat is shaped to cover the springs. This example deals with a sprung seat, but the methods for forming the stuffing are similar for both types.
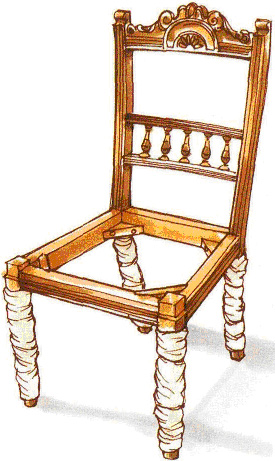
 

Preparing for work
Clear the bench or set up trestles to support the chair. If the frame is polished, lay strips of foam-backed carpet on the work surface to protect the finish.Stripping the upholstery
Although it is possible to make good an upholstered seat without stripping all the materials, a new seat built from the frame up will give longer service.
Stuffover seats

  1. Removing the covering
    Start by removing the top cover. Carefully prise out or pull the tacks from face-fixed coverings; you can use a ripping chisel to clear the tacks that are holding coverings under the rails. Try to save the fabric to use as a pattern for the new cover.
  2. Removing the stuffing
    Peel off the skin wadding and untack the calico lining. Lift off the second stuffing layer to reveal the scrim-covered first stuffing. Cut the twine through-ties, remove the scrim-fixing tacks and cut the stuffing ties at the same time as you remove the stuffing.
  3. Removing the springs
    Remove the tacks, always following the grain, and cut the spring ties to enable you to lift off the heavyweight hessian. Strip out the spring-lacing cord and then cut the fixing twine to free the springs. Remove the underside dust cover, if that has not already been stripped, and then the webbing.
    Stuffover seats
  4. Preparing the frame
    Make sure all the tacks are removed. Inspect the joints and rails, and repair them as required. Refurbish the wood finish and then bind the legs with a soft cloth to protect them while the upholstery work is completed.


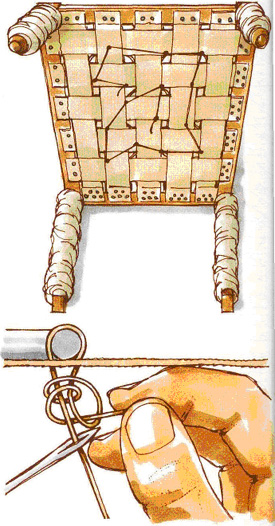
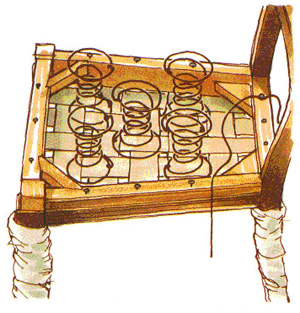
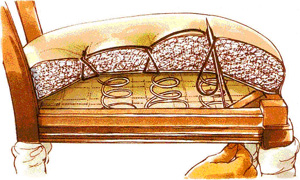
Building a sprung seat

Start by webbing the frame. The amount of webbing will depend on the size of the chair. A good guide is to allow about the width of one finger between the webs at the back and sides, and two fingers at the front. The webs arc tacked to the underside of the seat frame in a similar manner to that described for a drop-in seat.

Position the webs to provide all-round support to the base of the springs. Most often, four springs are placed symmetrically on the webbing. In order for the springs to exert equal pressure, arrange the twisted ends at the top of the coils to face the centre. If a fifth, central, spring is needed; place its twist facing forward.
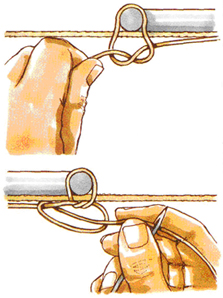
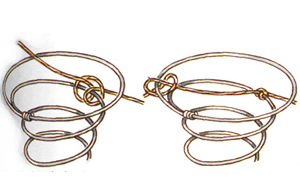
Stuffover seats

  1. Stitching the springs
    Start at one corner or with the central spring, if used. With the chair standing upright or laid on its back, stitch the base of the spring to the webbing, using a curved spring needle threaded with No 1 thickness twine.
  2. Starting the stitching
    Pass the needle up through the webbing, close to the outside edge of the base of the spring. Pass it back through, close to the inside of the coil, and secure the spring with a slipknot.
  3. Using a half-hitch knotStuffover seats
    Secure the remainder of the coil with two or three half-hitch knots Hitched through the webbing and spaced equally apart. Move on to the next spring, and sew it to the webbing with three or low half-hitches.
  4. Using a double-hitch knot
    Sett the other springs in place in the same way, and finally tie of the twine with a double-hitch knot on the last spring.


Tying the springsStuffover seats

In order for the springs to compress as one unit, the tops of the coils arc tied together with lengths of lay cord run from back to front and from side to side.

  1. Fixing a cord Partially drive 16mm improved tacks into the top edges of the seat frame in line with the springs. Cut the cord into lengths about twice the size of the seat. Knot a cord around a back tack about 225mm from the end, and then drive in a tack to fix it. Stuffover seats
  2. Tying the knots
    Compress the rear spring by about 50mm (2m), and secure the second coil with a dove-hitch knot. Continue across and onto the top coil of the spring, and tie a lock-loop knot. Secure the next spring in the reverse order, and finally tie off the cord on the opposite tack.
  3. Lacing the springs
    Lace all the springs from front to back and from side to side in this way, keeping the tension even. Where cords cross, tie them together with a lock loop. Tie the loose ends of each cord to the top coil of the spring with a double-hitch, so that they are held at a slight angle.


Covering the springs

Heavyweight hessian fabric is used to cover the springs evenly and to provide a sound base for the stuffing.

Stuffover seats

  1. Fitting the hessian
    Cut the hessian panel about 25mm larger than the seat. Tension the fabric over the springs without compressing them, and fix it to the top of the rails with light tacking. When the cover is even, fold over the edges and tack it permanently.Stuffover seats
  2. Stitching the springsSew the tops of the springs to the hessian cover, employing the same method as when tying them to the webbing.


Building the first stuffing

Once the foundation of webbing and springs is in place, the hair or fibre stuffing materials can be added.

Stuffover seats

  1. Sewing stuffing ties
    Using a curved needle, sew a row of stuffing ties about 60mm from the bottom edge of the sloping face of the hessian and across the middle.
  2. Placing the stuffing
    Pack rolls of stuffing under the ties to form a firm edge, and build up the centre to around 100mm (4in) deep, using more stuffing. Manipulate the stuffing to make it consistent and even in density and shape.
  3. Covering with scrim
    Cut an oversized panel of scrim to cover the stuffing, drape it evenly over the seat, and then temporarily tack it to each rail. Make a diagonal cut in the back corners to fit the covering around the back legs. Trim the surplus and fold in the spare scrim fabric at the ends.
  4. Making through ties
    Using a mattress Stuffover seats
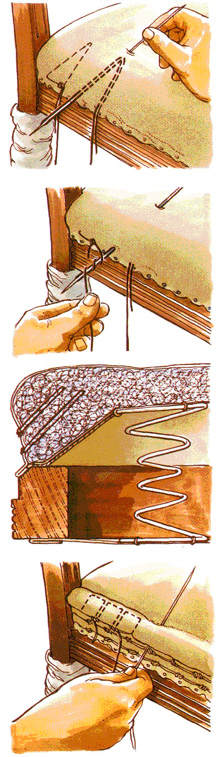
needle and twine, stitch ties through the stuffing to hold it in place. Starting in one corner of the covering, push the needle down through the stuffing and hessian covering the springs. Take the threaded end about 18mm forward, passing it back up to the point of entry and securing with a slip knot.Continue to make the ties around the seat with 100mm (4in) stitches above and 18mm below, finishing in the middle of the seat. Do not catch the springs.Stuffover seats
  5. Tacking the seat
    Starting at the front; remove a few of the temporary tacks at a time and, if required, push more stuffing under the scrim to firm up the edge. Tuck the edge of the scrim under the stuffing and tack it temporarily to the bevel on the top edge of the seat. Following a thread to keep the tension even, close-tack to the rail, working round all four sides.
  6. Pleating the corners
    Pack the corners with stuffing until hard. Tuck in the scrim to form neat pleats at the front corner, and tack the edges to secure them.


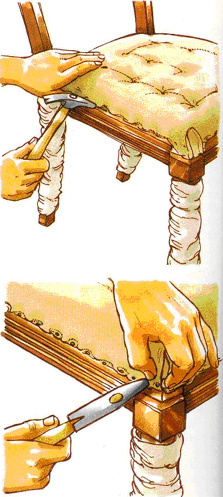
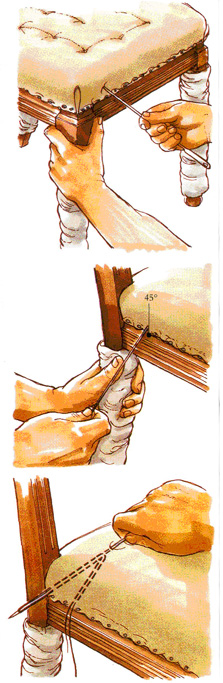
Forming an edge roll

In order to give the seat a well-defined shape and provide a firm support, blind stitches are used to consolidate the sides before an edge roll is formed.

Stuffover seats

  1. Using a regulator
    Moving the stuffing about with a regulator helps to reinforce and even out the edges. Insert the regulator through the scrim, and employ a stirring action to gather the fibre round the spike and pack it into position.
  2. Blind stitching
    Starting about 40mm from one of the back legs, insert a mattress needle threaded with twine into the edge just above the tack line, at an angle of 45 degrees.
  3. Knotting the stitch
    Pull the needle through, but not all the way out. With the eye still in the stuffing, angle it towards the back corner, and push it backwards so that the eye emerges close to the tack line. Pull the needle out, tie the end of the thread with a slip-knot and pull taut.Stuffover seats
  4. Making the next stitch
    Insert the needle about 50mm along from the first stitch, again at about 45 degrees, and pull it through to the eye as before. Push the needle backwards to emerge about 25mm from the point of entry.
  5. Tying the thread
    Before pulling the needle out, wind the thread secured by the slipknot three times in a clockwise direction around the needle. Pull the needle through the loops to knot the thread tightly.
  6. Completing the stitching
    Continue in this way along the side, the front, the other side and then the back, securing the ends of the thread with a double-hitch knot. Make a second row of stitches in a similar way, about 12mm above the first row. Use a regulator to get a good shape.
  7. Forming the edge roll
    Work the edge into an even line, using a regulator. Mark parallel stitch lines about 22mm from the edge on the top and sides. Starting at the side, make a series of 25mm long stitches to pass right through the edge, and finally knot them as described previously.


Second stuffing

Add more stuffing by sewing a series of stuffing ties across the seat and packing them to form an even shape, as described for a drop-in seat. The stuffing should be 50mm thick, and should taper to the edge without overhanging the edge roll.
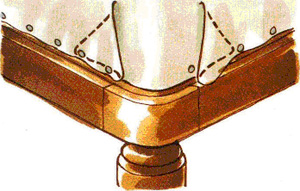
Tear a calico panel about 100mm larger than the seat, to cover it. Lay the calico in place and smooth it into an even dome shape. Tack it temporarily, working from the centre on all four sides. The edges are not tucked underneath, but are cut level with the tacks when they are finally fixed.

Stuffover seats

Making the back corners
Fold the fabric over at the corners and make a diagonal cut towards the leg. Fold the spare material under and tuck the covering around the leg before tacking it into place.

Stuffed corners

There are two methods ot making corners, depending on the leg shape.

Stuffover seats

  1. Forming rounded corners
    For rounded corners, make two even pleats on each side of the corner. Tension the fabric across the corner and fix it with a tack, then fold the pleats underneath.Stuffover seats
  2. Forming square corners
    To form a square corner, make a single pleat, tacking the spare fabric to the front rail


Fitting the top covering

The calico lining is now covered with one or two layers of wadding, torn to the shape of the seat. This is then overlaid with the top covering fabric, fitted in the same way as the calico, except that the spare material at the pleated corners is cut away from the inside of the folds, to give a neater appearance to the thicker fabric. In some cases the pleats may need to be closed with a neat line of slip stitches.

Finishing the edges
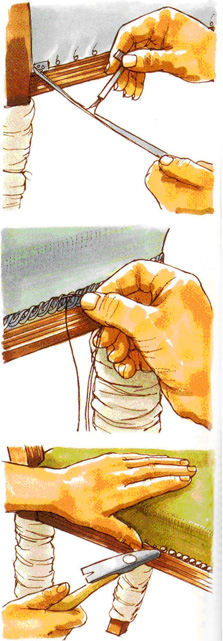
To finish off the tacked edges, use a decorative braid bonded in place with a fabric adhesive or preferably an electric glue gun which uses hot melt adhesive and is more controllable and dries much more quickly.

Stuffover seats

Gluing the braid
Fold back the end of the braid and tack it level with the back of the leg, using two gimp pins. Apply hot melt adhesive to the back of the braid and then press it into place around the seat. Fasten the other end with a gimp pin. Fix a length of braid to the back rail in the same way.

Sewing the braid
Braid can also be sewn into place using a small curved needle and fine thread. Make small stitches along the top and bottom edges.

Using upholstery nails
Nails can be used instead of braid. Alternatively, you can pin braid in place with chair nails. Space the nails to follow a straight and even line. For close nailing, ensure that the heads touch. Tap any misaligned nail heads sideways before driving them home. An easier alternative is to use nail strip which is a strip of continuous nails which are held in place by a real nail at intervals.